编写第一个 Swagger 文档
Swagger (OpenAPI) 是一种用于描述、生成和可视化 RESTful Web 服务的规范和工具集。
下面我将详细介绍如何从零开始编写你的第一个 Swagger 文档。
Swagger 文档主要采用 YAML 或 JSON 格式,定义了 API 的各个方面,包括:
- API 基本信息(标题、版本等)
- 可用路径和操作
- 输入参数和输出响应
- 验证方式
- 数据模型定义
创建步骤
1. 创建基本文件结构
首先,创建一个名为 swagger.yaml 或 swagger.json 的文件。本教程以 YAML 格式为例,因为它更易于阅读和编写。
实例
openapi: 3.0.0
info:
title: 我的第一个API
description: 这是一个简单的API示例文档
version: 1.0.0
contact:
name: API 支持团队
email: support@example.com
url: https://www.example.com/support
servers:
- url: https://api.example.com/v1
description: 生产环境
- url: https://dev-api.example.com/v1
description: 开发环境
info:
title: 我的第一个API
description: 这是一个简单的API示例文档
version: 1.0.0
contact:
name: API 支持团队
email: support@example.com
url: https://www.example.com/support
servers:
- url: https://api.example.com/v1
description: 生产环境
- url: https://dev-api.example.com/v1
description: 开发环境
2. 添加文档基本信息
实例
openapi: 3.0.0
info:
title: 我的第一个API
description: 这是一个简单的API示例文档
version: 1.0.0
contact:
name: API 支持团队
email: support@example.com
url: https://www.example.com/support
servers:
- url: https://api.example.com/v1
description: 生产环境
- url: https://dev-api.example.com/v1
description: 开发环境
info:
title: 我的第一个API
description: 这是一个简单的API示例文档
version: 1.0.0
contact:
name: API 支持团队
email: support@example.com
url: https://www.example.com/support
servers:
- url: https://api.example.com/v1
description: 生产环境
- url: https://dev-api.example.com/v1
description: 开发环境
3. 定义路径和操作
路径定义了 API 可以访问的端点,操作定义了可以对这些端点执行的 HTTP 方法(GET, POST, PUT, DELETE 等)。
实例
paths:
/users:
get:
summary: 获取所有用户列表
description: 返回系统中的所有用户信息
operationId: getUsers
parameters:
- name: limit
in: query
description: 返回结果的最大数量
required: false
schema:
type: integer
format: int32
minimum: 1
maximum: 100
default: 20
responses:
'200':
description: 成功获取用户列表
content:
application/json:
schema:
type: array
items:
$ref: '#/components/schemas/User'
'400':
description: 无效请求
content:
application/json:
schema:
$ref: '#/components/schemas/Error'
post:
summary: 创建新用户
description: 在系统中创建一个新用户
operationId: createUser
requestBody:
description: 用户信息
required: true
content:
application/json:
schema:
$ref: '#/components/schemas/NewUser'
responses:
'201':
description: 用户创建成功
content:
application/json:
schema:
$ref: '#/components/schemas/User'
'400':
description: 无效请求
content:
application/json:
schema:
$ref: '#/components/schemas/Error'
4. 定义组件和模型
在 components 部分定义可重用的模型:
实例
components:
schemas:
User:
type: object
properties:
id:
type: integer
format: int64
description: 用户唯一标识
username:
type: string
description: 用户名
email:
type: string
format: email
description: 用户邮箱
status:
type: string
enum: [active, inactive, banned]
description: 用户状态
createdAt:
type: string
format: date-time
description: 创建时间
required:
- id
- username
- email
- status
NewUser:
type: object
properties:
username:
type: string
description: 用户名
email:
type: string
format: email
description: 用户邮箱
password:
type: string
format: password
description: 用户密码
minLength: 8
required:
- username
- email
- password
Error:
type: object
properties:
code:
type: integer
format: int32
message:
type: string
required:
- code
- message
schemas:
User:
type: object
properties:
id:
type: integer
format: int64
description: 用户唯一标识
username:
type: string
description: 用户名
email:
type: string
format: email
description: 用户邮箱
status:
type: string
enum: [active, inactive, banned]
description: 用户状态
createdAt:
type: string
format: date-time
description: 创建时间
required:
- id
- username
- status
NewUser:
type: object
properties:
username:
type: string
description: 用户名
email:
type: string
format: email
description: 用户邮箱
password:
type: string
format: password
description: 用户密码
minLength: 8
required:
- username
- password
Error:
type: object
properties:
code:
type: integer
format: int32
message:
type: string
required:
- code
- message
5. 添加安全定义
定义 API 的安全要求:
实例
security:
- bearerAuth: []
components:
securitySchemes:
bearerAuth:
type: http
scheme: bearer
bearerFormat: JWT
- bearerAuth: []
components:
securitySchemes:
bearerAuth:
type: http
scheme: bearer
bearerFormat: JWT
6. 完整文档示例
将上面的所有部分组合起来,你就得到了一个完整的 Swagger 文档。
实例
openapi: 3.0.0
info:
title: 我的第一个API
description: 这是一个简单的API示例文档
version: 1.0.0
contact:
name: API 支持团队
email: support@example.com
url: https://www.example.com/support
servers:
- url: https://api.example.com/v1
description: 生产环境
- url: https://dev-api.example.com/v1
description: 开发环境
paths:
/users:
get:
summary: 获取所有用户列表
description: 返回系统中的所有用户信息
operationId: getUsers
parameters:
- name: limit
in: query
description: 返回结果的最大数量
required: false
schema:
type: integer
format: int32
minimum: 1
maximum: 100
default: 20
responses:
'200':
description: 成功获取用户列表
content:
application/json:
schema:
type: array
items:
$ref: '#/components/schemas/User'
'400':
description: 无效请求
content:
application/json:
schema:
$ref: '#/components/schemas/Error'
post:
summary: 创建新用户
description: 在系统中创建一个新用户
operationId: createUser
requestBody:
description: 用户信息
required: true
content:
application/json:
schema:
$ref: '#/components/schemas/NewUser'
responses:
'201':
description: 用户创建成功
content:
application/json:
schema:
$ref: '#/components/schemas/User'
'400':
description: 无效请求
content:
application/json:
schema:
$ref: '#/components/schemas/Error'
components:
schemas:
User:
type: object
properties:
id:
type: integer
format: int64
description: 用户唯一标识
username:
type: string
description: 用户名
email:
type: string
format: email
description: 用户邮箱
status:
type: string
enum: [active, inactive, banned]
description: 用户状态
createdAt:
type: string
format: date-time
description: 创建时间
required:
- id
- username
- email
- status
NewUser:
type: object
properties:
username:
type: string
description: 用户名
email:
type: string
format: email
description: 用户邮箱
password:
type: string
format: password
description: 用户密码
minLength: 8
required:
- username
- email
- password
Error:
type: object
properties:
code:
type: integer
format: int32
message:
type: string
required:
- code
- message
securitySchemes:
bearerAuth:
type: http
scheme: bearer
bearerFormat: JWT
security:
- bearerAuth: []
info:
title: 我的第一个API
description: 这是一个简单的API示例文档
version: 1.0.0
contact:
name: API 支持团队
email: support@example.com
url: https://www.example.com/support
servers:
- url: https://api.example.com/v1
description: 生产环境
- url: https://dev-api.example.com/v1
description: 开发环境
paths:
/users:
get:
summary: 获取所有用户列表
description: 返回系统中的所有用户信息
operationId: getUsers
parameters:
- name: limit
in: query
description: 返回结果的最大数量
required: false
schema:
type: integer
format: int32
minimum: 1
maximum: 100
default: 20
responses:
'200':
description: 成功获取用户列表
content:
application/json:
schema:
type: array
items:
$ref: '#/components/schemas/User'
'400':
description: 无效请求
content:
application/json:
schema:
$ref: '#/components/schemas/Error'
post:
summary: 创建新用户
description: 在系统中创建一个新用户
operationId: createUser
requestBody:
description: 用户信息
required: true
content:
application/json:
schema:
$ref: '#/components/schemas/NewUser'
responses:
'201':
description: 用户创建成功
content:
application/json:
schema:
$ref: '#/components/schemas/User'
'400':
description: 无效请求
content:
application/json:
schema:
$ref: '#/components/schemas/Error'
components:
schemas:
User:
type: object
properties:
id:
type: integer
format: int64
description: 用户唯一标识
username:
type: string
description: 用户名
email:
type: string
format: email
description: 用户邮箱
status:
type: string
enum: [active, inactive, banned]
description: 用户状态
createdAt:
type: string
format: date-time
description: 创建时间
required:
- id
- username
- status
NewUser:
type: object
properties:
username:
type: string
description: 用户名
email:
type: string
format: email
description: 用户邮箱
password:
type: string
format: password
description: 用户密码
minLength: 8
required:
- username
- password
Error:
type: object
properties:
code:
type: integer
format: int32
message:
type: string
required:
- code
- message
securitySchemes:
bearerAuth:
type: http
scheme: bearer
bearerFormat: JWT
security:
- bearerAuth: []
7. 使用 Swagger 工具
有多种方式可以可视化和测试你的 Swagger 文档:
- Swagger UI:一个交互式文档页面
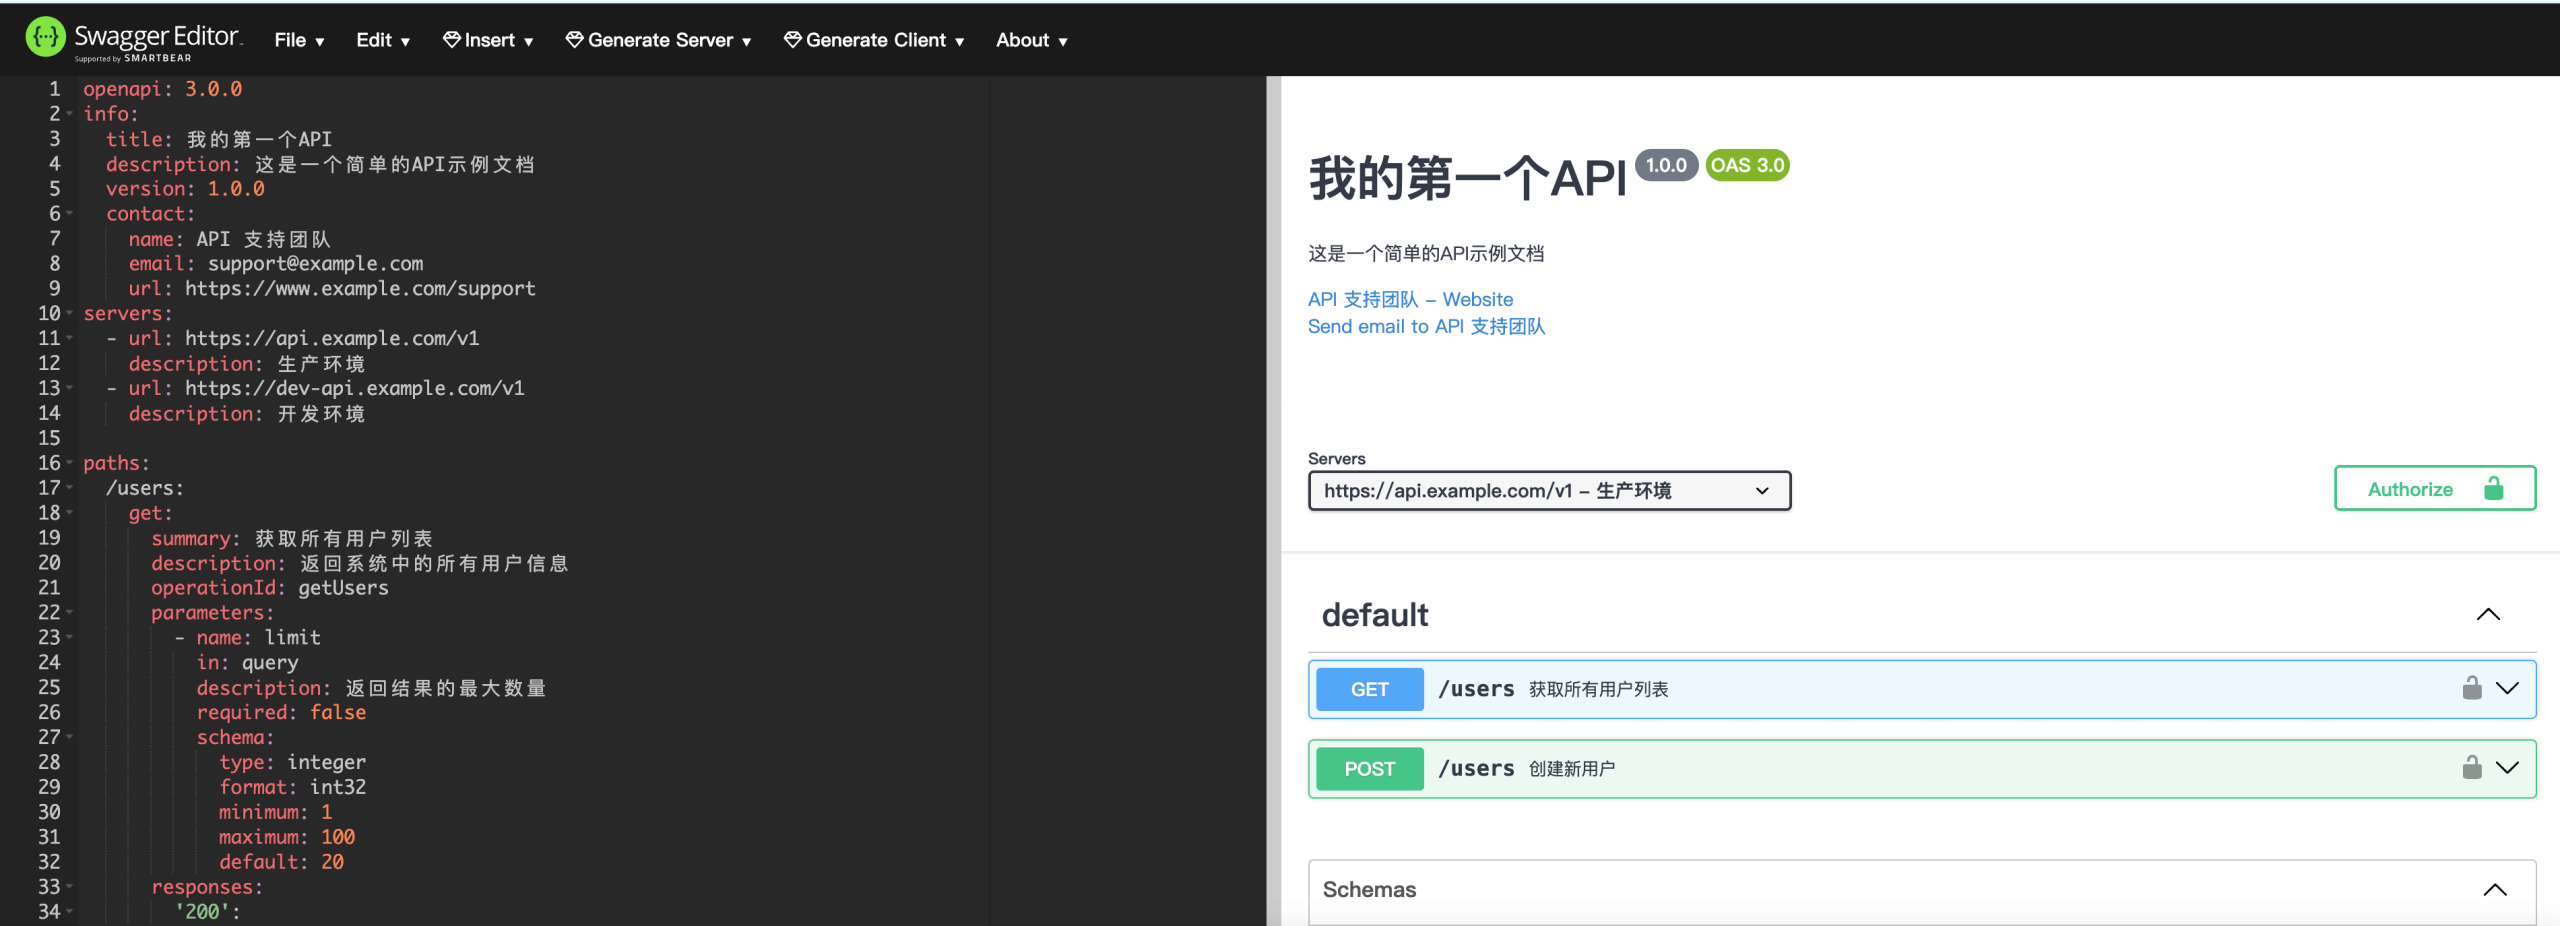
- Swagger Editor:在线编辑器,可以实时预览文档
- Swagger Codegen:生成客户端代码的工具
8. 在线测试你的文档
你可以使用 Swagger Editor 在线测试你的文档。只需将你的 YAML 或 JSON 复制粘贴到编辑器中,右侧面板将显示可视化的 API 文档。
9. 最佳实践
- 使用有意义的操作 ID
- 为每个端点提供详细描述
- 确保所有参数都有描述
- 记录所有可能的响应状态码
- 使用模型引用来减少重复
- 保持文档的更新
- 为每个端点添加示例请求和响应
10. 常见参数位置
Swagger 定义了几种参数位置:
path:URL 路径中的参数,如/users/{id}query:URL 查询参数,如/users?limit=10header:HTTP 头部参数cookie:Cookie 参数body:请求体参数(OpenAPI 3.0 中使用 requestBody 代替)
11. 扩展你的文档
随着 API 的发展,继续扩展你的 Swagger 文档:
- 添加更多端点
- 定义额外的模型
- 增加更详细的说明
- 添加请求和响应示例
12. 实际开发集成
在实际开发中,你可以:
- 将 Swagger 集成到你的代码中
- 使用自动生成工具
- 从代码注释生成文档
- 将 Swagger UI 嵌入到你的应用程序中

点我分享笔记